INTER-LAYER - Device to Device (D2D): How to support D2D communication among different IoT devices through a Gateway-based approach
(Getting Ready) Communication scenario description
- The communication scenario to be developed in this recipe is shown in the following figure in which two different IoT devices (i.e. a Polar H7 Chest band and a Waspmote sensor) can communicate their acquired data on different radio interfaces to a gateway. The gateway can also communicate with a smartphone on which a specific application can get the sensed date values. The whole communication supports the CoAP protocol well suited for IoT scenarios.
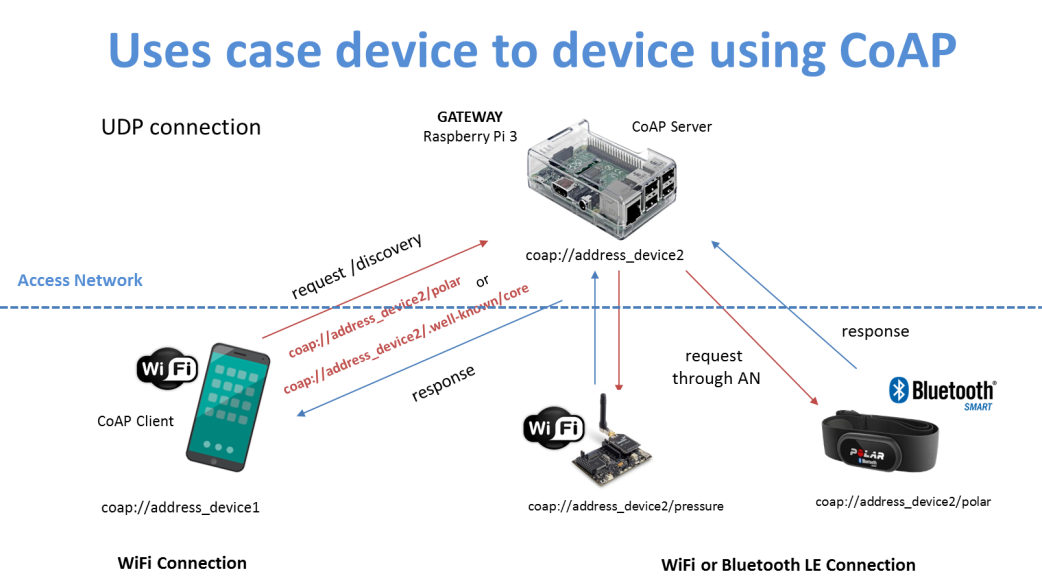
Figure 1. Overall communication scenario
Recipe ingredients
- HW: Raspberry Pi 3, Polar H7 Chest band, Waspmote wifi sensors (Waspmote board v12, module wifi radio, gases board v2.0 with the pressure sensor installed, battery), Smartphone android.
- SW: Inter-Layer D2D component (downloadable from https://git.inter-iot.eu/Inter-IoT/gateway)
Prerequisites
- Java 1.8
- Maven 3.6 freely downloadable at [https://maven.apache.org/docs/3.6.0/release-notes.html]
- Java developing environment SDK
- Android application IoT Coap provided by Bluedev and freely downloadable from Android Playstore
- SDK for Waspmote devices (Waspmote Pro IDE - v04) freely downloadable at [http://www.libelium.com/v12/development/waspmote/sdk_applications/]
(How to Do it) Software installation and module configuration
- Here we describe how to download and install the software developed within the INTER-IoT project; then, we detail how to extend the code by implementing specific adapters and controllers for the Bluetooth and WiFi interfaces.
- First of all we will work with the Gateway component (Athens version) developed within the INTER-IoT project to support the Inter-Layer D2D communication downloadable at: https://git.inter-iot.eu/Inter-IoT/gateway/src/0.2.0
- Load the IDE and import the project as a new maven project in the workspace
- Now we need to add two novel and specific controller modules to handle the Polar H7 chest band for the heart rate monitoring and the Waspmode Wifi for the atmospheric pressure monitoring. In particular, data must be requested and acquired through the CoAP protocol
- File JSON for the Waspmote:
{

    "id": "wasp_wifi_01",
    "name": "waspmote_pressure",
    "controller": "waspmote",
    "controller_opts":{},
    "access_network": "wifi",
    "access_network_opts": {
        "MAC":"XX:XX:XX:XX:XX"
    },
    "protocol": "coap",
    "protocol_opts": {"URI":"coap://127.0.0.1:5683/waspmote"
            },
    "device_io": [
        {
            "type":"sensor",
            "attr_name":"pressure",
            "attr_type":"float"

        }
    ]
}
- File JSON for the PolarH7
{

    "id": "polarh7_01",
    "name": "heart_rate_monitor",
    "controller": "polarh7",
    "controller_opts":{},
    "access_network": "ble",
    "access_network_opts": {
        "MAC":"XX:XX:XX:XX:XX"
    },
    "protocol": "coap",
    "protocol_opts": {"URI":"coap://127.0.0.1:5683/polar"
            },
    "device_io": [
        {
            "type":"sensor",
            "attr_name":"heart_rate_monitor",
            "attr_type":"integer"

        }
    ]
}
- Once these JSON files have been created, they need to be added to the folder in the path: gateway/src/physical/distribution-files/devices
ADDING THE NEW CONTROLLER MODULES
-
Download the software package implementing the PolarH7 controller from here and copy it in the folder gateway/src/physical/extensions
-
Download the software package implementing the Waspmote controller from here and copy it in the folder gateway/src/physical/extensions
-
Modify the pom.xml file placed in gateway/src/physical by adding the following row in order guide maven toward the right compiling of the new controllers:
-
<module>extensions/device-controller.polarh7</module>
-
<module>extensions/device-controller.waspmote</module>
-
MODYFING THE PROTOCOL CONTROLLER
- Download the software package implementing the Protocol Controller module from here and unpack it into the folder: gateway/src/physical/core
IMPLEMENTING THE CoAP PROTOCOL
-
Download the software package implementing the CoAP Protocol module from here and unpack it into the folder: gateway/src/physical/ extensions
-
In particular the package in the path: physical/extensions/protocol-module.coap/src/main/java/eu/interiot/gateway/protomodule/coap/api/impl implements the following classes:
-
Coap.java: implements the interface _ProtocolModule, handles the CoAP server , builds the resources and allows advanced connections
-
CoapModuleConnection.java: implements the Connection interface, handles bacis connections for the CoAP protocol
-
PolarH7AdapterBLEProcess.java: handles the communication with the PolarH7 via Bluetooth Low Energy. This class takes advantages from the native Linux commands to make the discovery.
-
PolarH7Resource.java: creates the PolarH7 resource for the CoAP Protocol
-
WaspmoteAdapterWifi.java: handles the wifi adapter to communicate with the waspmote device
-
WiFiWaspMoteResource.java: creates the waspmote resource for the CoAP Protocol
-
COMPILING THE GATEWAY - To compile the new project, in the root of the gateway project use the command: maven mvn clean package
-
The compiled code will be automatically placed in the folder: gateway/target
-
Copy the compiled code in the gateway/target folder on the Raspberry Pi3 to run the new gateway
COMPILING THE WASPMOTE DEVICE APPLICATION
-
Download the software package from the here
-
Upack the software in some folder and use the SDK for Waspmote to open it
-
Change the following variables
-
#define IP_ADDRESS "address_of_gateway"
-
#define ESSID "your WiFi AP"
-
#define AUTHKEY "your_password_wifi"
-
Compile and upload it on the device
-
(How it Works) Running and collecting results
Here we show how to run the gateway on the Raspberry Pi3 and how to display and collect the results in real time.
-
In the folder gateway/target/virtual execute the command: Java -jar gateway.framework-0.2.0.jar
-
In the folder gateway/target/physical execute the command: Java -jar gateway.framework-0.2.0.jar
-
It is really important to execute the virtual command before the physical one
-
Once the gateway is running, a console command with the "gateway" prompt will be available as shown in figure 2.
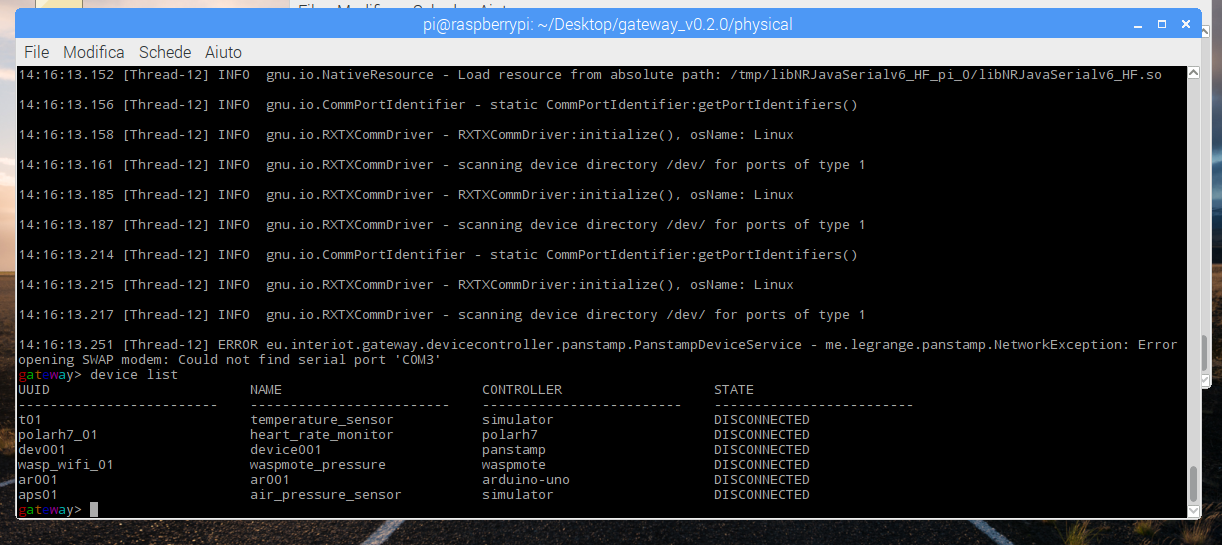
Figure 2. Gateway console on the Raspberry Pi3
To test the implemented controllers, the following commands can be used:
-
device list: it shows the list of the devices registered on the gateway
-
device connect \<device-UUID>: it allows the connection with the device having the specific UUID;, in our case we use polarh7_01 for the chest band and wasp_wifi_01 for the Waspmote.
-
RESULTS via Console
-
To make the connection to the waspmote device with the UUID wasp_wifi_01, the command to be executed is: device connect wasp_wifi_01
-
The device send back the measured value of the atmospheric pressure through the CoAp protocol. In this case the value is 108.451 kPa as shown in figure 3.
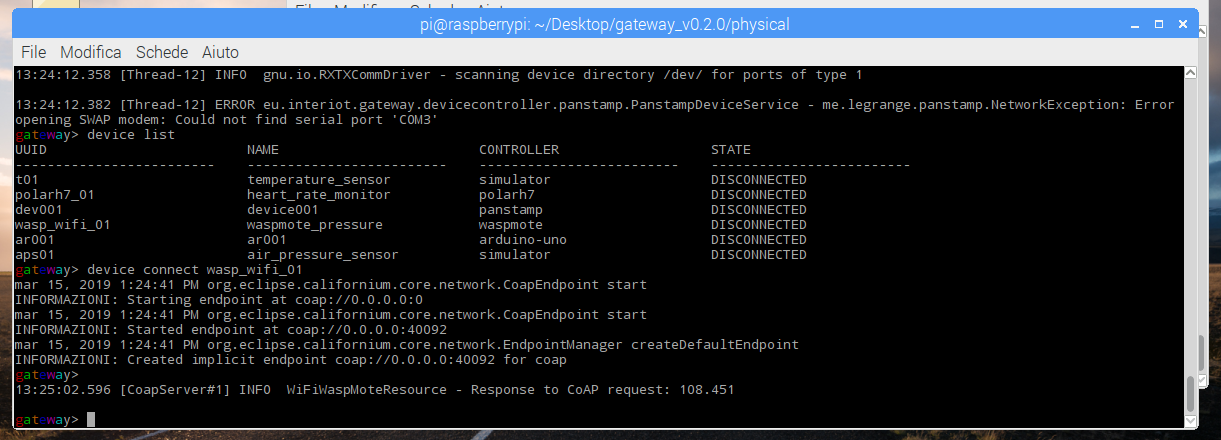
Figure 3. Waspmote device connection
To make the connection to the PolarH7 device with the UUID polarh7_01, the command to be executed is: device connect polarh7_01
The device send back the measured values of the heart rate in a time window of 1 minute as shown in figure 4.
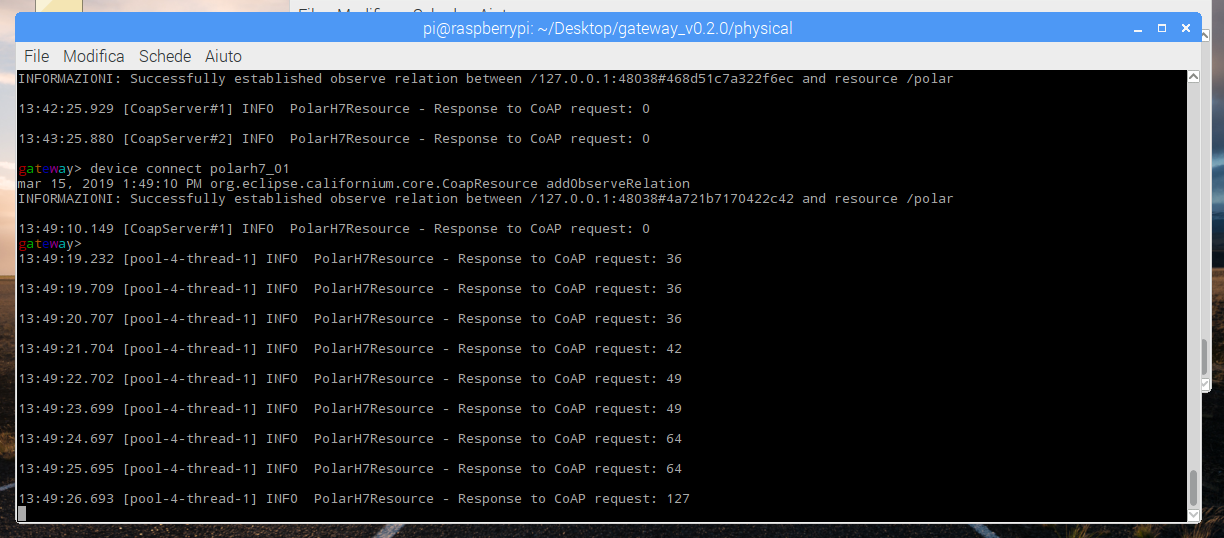
Figure 4. PolarH7 device connection
-
RESULTS via Android APP Using the IoT CoAP application already downloaded from the Android store and installed on the smartphone, it is possible:
-
To make a connection with the gateway
-
To make the a discovery resource presented by the PolarH7 and Waspmote devices
-
To make a specific data request to the connected IoT devices
Once executed the application on the smartphone, it is necessary to define an endpoint by selecting the IP address of the gateway as shown in figure 5 (My gateway)
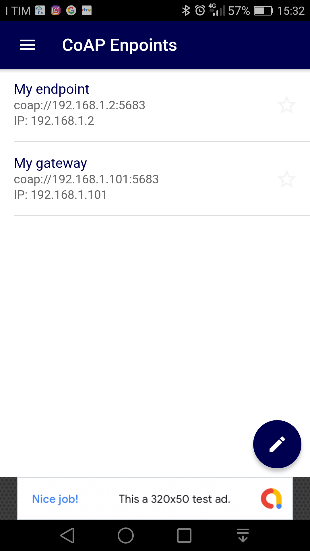
Figure 5. CoAP end point on the smartphone application
-
Make a resource discovery:
-
Select My gateway
-
Select the specific action type as shown in figure 6 and the resources acquired by the two devices (PolarH7 and Waspmote) will be shown as in figure 7
-
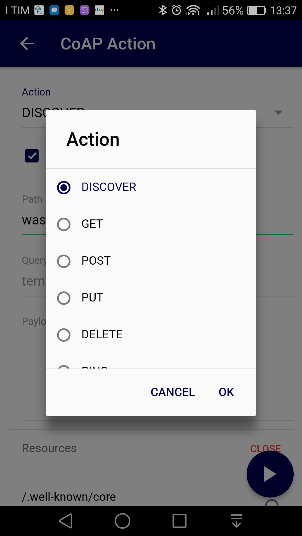
Figure 6 Action selection
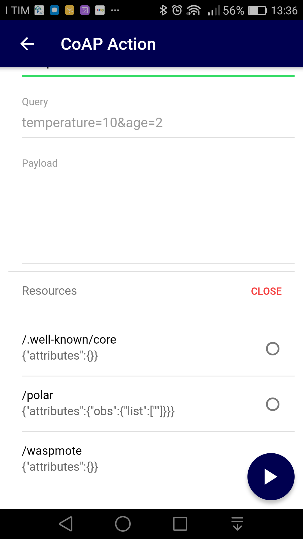
Figure 7. Resources visualization
-
Make a resource request:
-
Select action Get as shown in figure 8
-
Select the button blue play to get the value from the gateway as shown in figure 9 that in this case is the atmospheric pressure measured by the waspmote equal to 106.741 kPa.
-
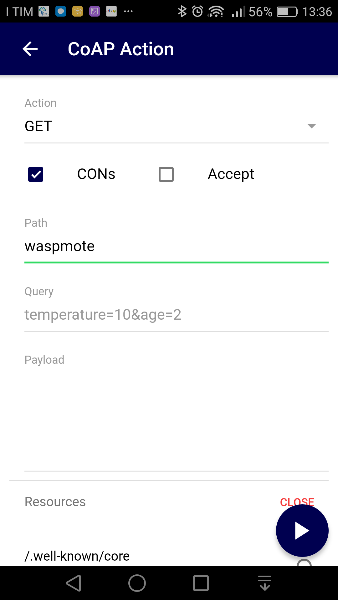
Figure 8 Action GET selection

Figure 9 CoAP Response
- Cooked dish: The overall and real "cooked dish" consisting of all ingredients presented in this recipe is shown in figure 10.
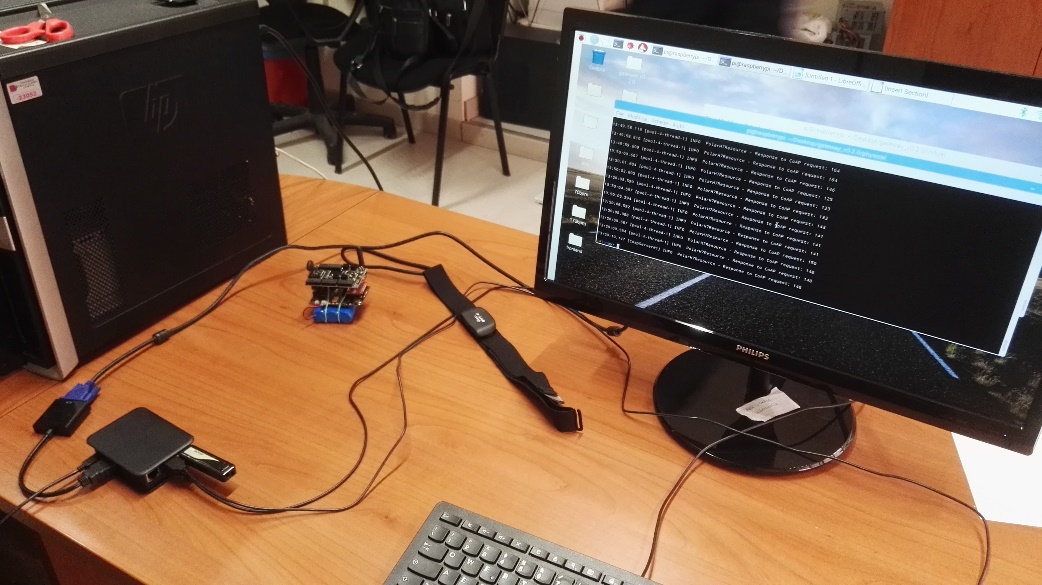
Figure 10. The final aspect of the D2D recipe.