INTER-LAYER - Application Services to Application Services (AS2AS): How to deploy and manage multiple instances of AS2AS interoperability solution
The following recipe provides the information to perform the deployment of the AS2AS interoperability solution. An AS2AS instance is used as a work environment to provide access to the available IoT services and to create new flows of interoperability between services.
Through the deployment recipe you can create and manage as AS2AS instances as you need using a web service.
(Getting Ready) Description
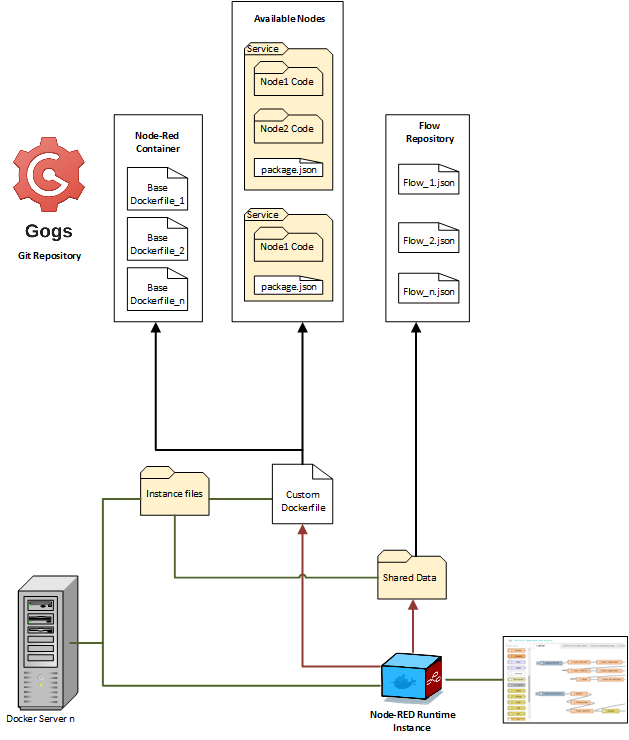
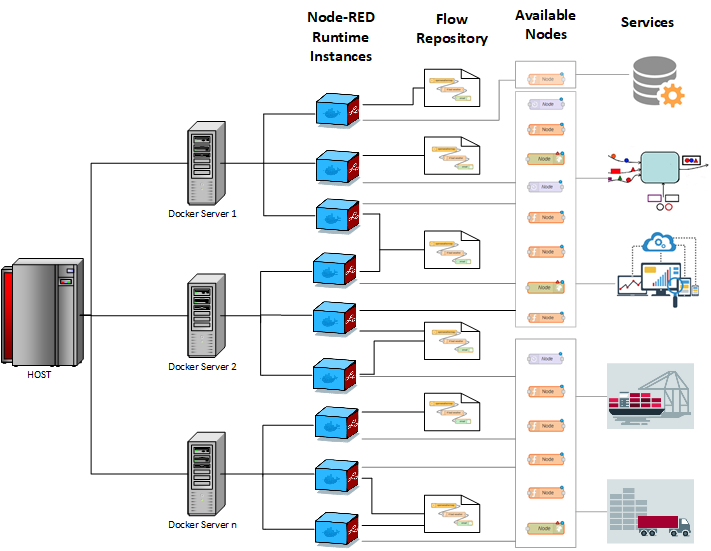
An instance of AS2AS interoperability solution offers a complete interoperability architecture. The core components of AS2AS architecture are based in a Flow Based Programming tool. The following picture provides a technical overview of an instance of the interoperability solution.
A user can easily deploy a single instance of the interoperability solution following these steps.
But, if a user wants to take advantage of the utilities offered, he can follow the steps that are offered in this recipe. Then, he can achieve a technical deployment similar to the following image:
Recipe ingredients
- Hardware: Personal computer or Server.
- Software: Inter-Layer Datatransformer AS2AS component (downloadable from INTER-IoT Github)
Prerequisites
- Windows or Linux Operative System
- Docker
- Docker-compose
- MongoDB
- Node.js
- Minikube
(How to Do it) Software installation
In this recipe we are going to provide the steps to install the software in an Ubuntu Server. But, you can follow similar steps using Windows.
To install the multitenancy softtware it is necesary to have previously installed the software indicated in Prerequisites section.
Firstly, update the server:
sudo apt upgrade
Secondly, install Docker that offers the computer program that performs operating-system-level virtualization:
sudo apt install docker.io
Thirdly, install Docker-compose. A tool for defining and running multi-container Docker applications.
sudo curl -L "https://github.com/docker/compose/releases/download/1.23.2/docker-compose-$(uname -s)-$(uname -m)" -o /usr/local/bin/docker-compose

sudo chmod +x /usr/local/bin/docker-compose
Fourthly, install MongoDB that acts as the database of the information of the running instances of the AS2AS solution.
sudo apt-get install mongodb
After that configure a MongoDB Database with an user and password. Following these steps
The fifthly step is install Node.js in order to run the AS2AS multitenancy Webservice.
MongoDB is used to store information about resources. The URL of MongoDB must be set through environment variable, such as
$export MONGODB_URL=
Alternatively, the source code of data/db.js can be modified to hardcode the URL.
sudo apt install curl
curl -sL https://deb.nodesource.com/setup_8.x | sudo -E bash -
sudo apt install nodejs
Finally, as a prerquisite you need to install Minikube that acts as an open-source system for automating deployment, scaling, and management of containerized applications.
curl -Lo minikube https://storage.googleapis.com/minikube/releases/latest/minikube-linux-amd64 \ && chmod +x minikube

sudo cp minikube /usr/local/bin && rm minikube
The last step is downdload the Multitenancy Webservice and run it:
npm start
(How it Works) Running and collecting results
In the previous section you have installed a multitenancy Webservice based on AS2AS instances. The idea is that the provider offers "AS2AS service" as a resource. You can find here more information.
One consumer can request a resource then submit workflows to the resource to perform flows of interoperability. An user can perform the following actions:
- Check if the service is available:
curl -X GET http://[hostname]:3004/datatransformer
- Create a new data transformer without information about tenant:
curl -X POST http://[hostname]:3004/datatransformer
- Create a new data transformer with information about tenant:
You can also specify tenant information (tenantId, name, description) using
curl -X POST http://[hostname]:3004/datatransformer
with the body of
{tenantId:[id],description:[description], name:[name]} where tenantId, description, and name are provided by the creator.
for example:
$curl --header "Content-Type: application/json" --request POST --data '{ "tenantId": "valenciaportcontrol", "description": "this is a special instance for valencia port", "name":"truckprocessor"}' http://[hostname]:3004/datatransformer
would return an instance:
{"_id":"5b4fdcbdb03bd3e52f058a68","tenantId":"valenciaportcontrol","description":"this is a special instance for valencia port","name":"truckprocessor","location":"creating...","createdAt":1531960508701,"datatransformerId":"datatransformer1531960508701","port":1880,"url":"pending...","__v":0}xxxxx@xxxx:~$
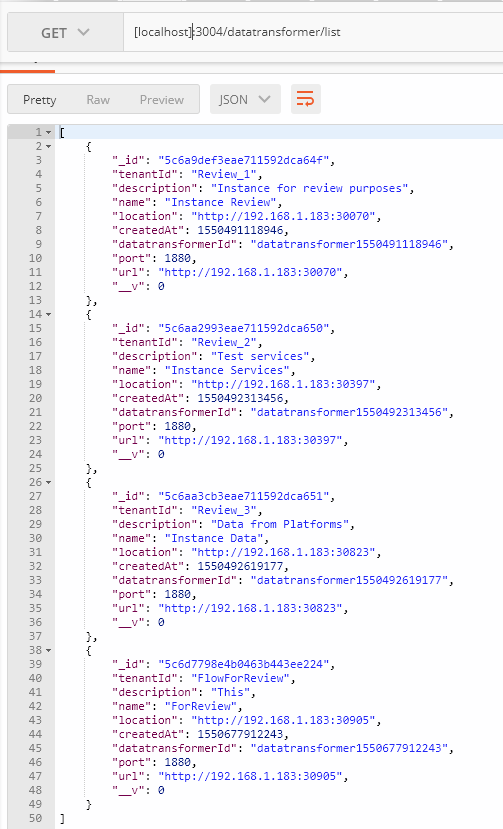
- List existing transformer resources:
curl -X GET http://[hostname]:3004/datatransformer/list
- Get detailed information about a transformer For example, with the id =datatransformer1528623333334:
curl -X GET http://[hostname]:3004/datatransformer/datatransformer1528623333334
- Remove a transformer for example, with the id = datatransformer1528623333334
curl -X DELETE http://[hostname]:3004/datatransformer/datatransformer1528623333334
- Install a node
curl -X POST http://[hostname]:3004/datatransformer/installNode/[datatransformerId]
The module to install can be retrieved from two different sources: npm and a private Git repository. The body of the request must be like the following examples:
npm

{ "module": "@interiot/node-red-contrib-fiware-sth", "origin": "npm" }
private Git repository

{ "module": "node-red-contrib-position-simu", "repositoryUrl": "https://git.inter-iot.eu/enolgor/node-red-contrib-position-simu.git", "origin": "private" }
This method would return a message with the result of the request.
- Delete an installed node module
curl -X DELETE http://[hostname]:3004/datatransformer/deleteNodeModule/[datatransformerId]/[nodeModule]
- Set active flows
curl -X POST http://[hostname]:3004/datatransformer/setFlows/[datatransformerId]
The active nodes description (in JSON) can be retrieved from two different sources:
-
Request's body: include the description of the flows in JSON format in the body of the request
-
Git repository: the request must include a header called Flow-Url that consists in the url of the raw JSON file of the flows' description (example: https://github.com/INTER-IoT/as2as_utils/raw/master/flows/universAAL/universaal-examples.json)
Finally, you can find two extra screenshots of this API's running.
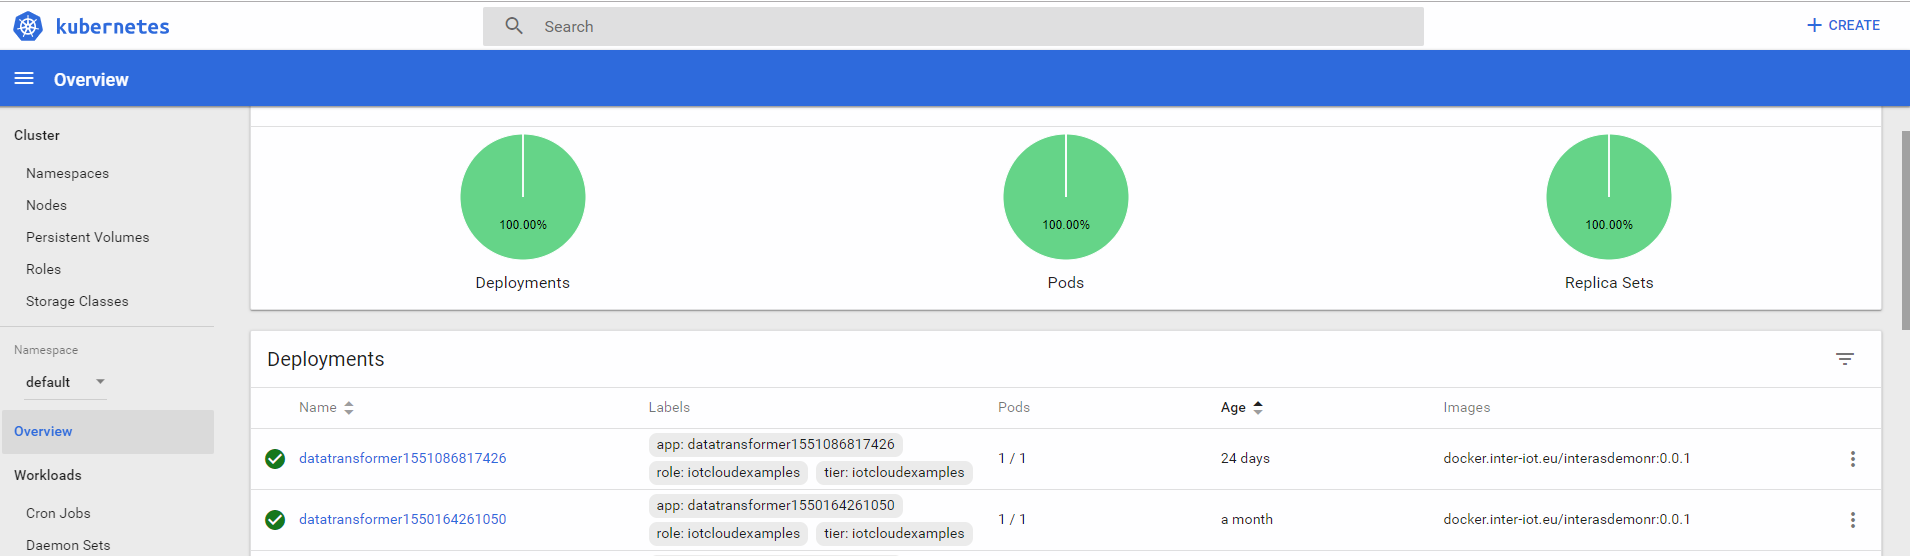
- Kubernetes provides a dashboard where you can see the deployed instances of AS2AS.
- An example of a call to the List of running AS2AS instances using postman: