INTER-LAYER - Application Services to Application Services (AS2AS): How to create a node to access to a IoT Service
The following recipe provides the information about how to create a node compatible with the AS2AS interoperability solution, that performs the access to an IoT Service.
It explains the pieces of code that an user needs to develop to wrap the access to an IoT Service. Once, this development is finished, then it can be integrated in the visual palette of an AS2AS instance and you can use it in your future flows
(Getting Ready) IoT Service Scenario Description
As can be seen in the AS2AS documentation, nodes and flows are the two main elements in this interoperability layer.
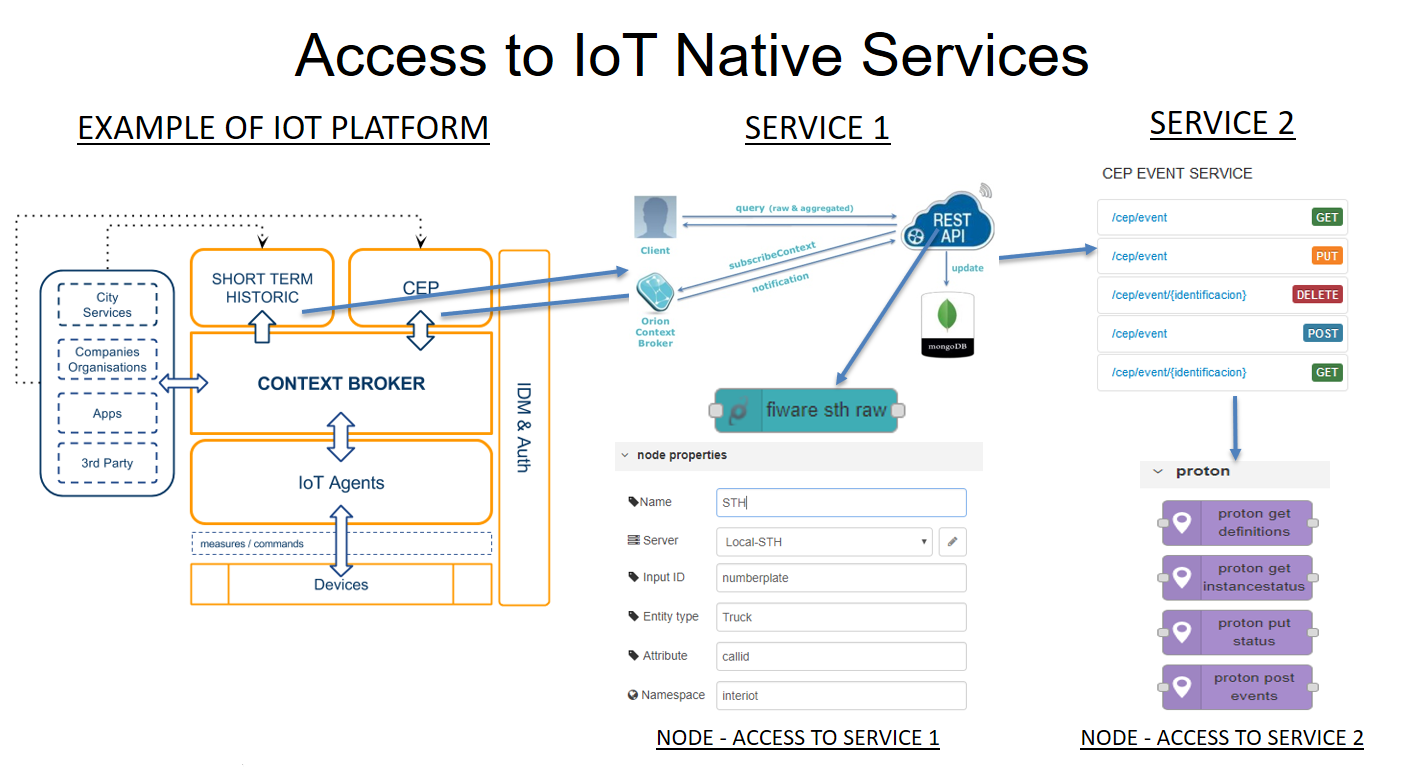
The users and developers can contribute creating nodes, compatible with AS2AS instances, to implement the access to the services and to its funcionalities. The following picture provides as an example the access to two services from Fiware.
This first and second link provides extra information about the process of develop new node. In addition, in the INTER-IoT Github repository are available a lot of nodes developed during the project.
Recipe ingredients
- Hardware: Personal computer.
- Software: Not necesary, but recomendable an IDE like Visual Studio Code to develop the nodes.
Prerequisites
(How to Do it) Steps to develop a node
To facilitate the reading of this recipe we are going to provide links to the main informatition to develop a new node.
The "Analysis of the service" steps are related with access and describe to the funcionalities of the WebService. It is recomendable deploy it using docker and test it. For example, here you can find the example about how to deploy using docker our ioT Services.
The "Node implementation" steps are the core of this recipe. The complete documentation about how to create a service are available here.
The "test" and "documentation" steps are usually provided in the git repository of the node, or in the documentation. Here you can find a good example developed during the project.
Find the complete list of steps to wrap a service using a node:
- Analysis of the service:
- Development or access to a functional instance of the IoT platform.
- Get access to the services that the platform offers.
- Deploy or access an instance of the service.
- Test the service with data.
- Analyze the functionalities offered by the service.
- Study the API that provides the service.
- Document the functionalities and APIs.
- Analyze the methods of access and execution of these functionalities.
- Analyze the messages or actions that return the execution of the functionalities of the service.
- Node Implementation:
- Group the functionality of the service, to choose the number of nodes and how they will be the nodes that implement it.
- Identify the parameters needed to access the service.
- Creation of configuration nodes. For example, they store the connection variables.
- Create the interface that collects the parameters that will consume the service. (html)
- Create the code that will execute the functionality (JavaScript).
- Define the messages that the node sends and receives.
- If it is possible attach an instance of the service in docker.
- Test:
- Access to the node with real data.
- Test the correct operation.
- Fix bugs and catch errors.
- Documentation:
- Document about how to deploy service with real data, to have examples of operation.
- Document about the characteristics of the node
Finally you can install manually the nodes:
cd $HOME/.node-red
npm install <npm-package-name>
Or if you are using the multitenancy solution deployed in recipe1 you can use the following API call:
- Install a node
curl -X POST http://[hostname]:3004/datatransformer/installNode/[datatransformerId]
The module to install can be retrieved from two different sources: npm and a private Git repository. The body of the request must be like the following examples:
npm

{ "module": "@interiot/node-red-contrib-fiware-sth", "origin": "npm" }
private Git repository

{ "module": "node-red-contrib-position-simu", "repositoryUrl": "https://git.inter-iot.eu/enolgor/node-red-contrib-position-simu.git", "origin": "private" }
This method would return a message with the result of the request.
- Delete an installed node module
curl -X DELETE http://[hostname]:3004/datatransformer/deleteNodeModule/[datatransformerId]/[nodeModule]
(How it Works) Running and collecting results
The common use of the nodes are the creation of flows of interoperability between IoT services and applications, to offer a composition of services.
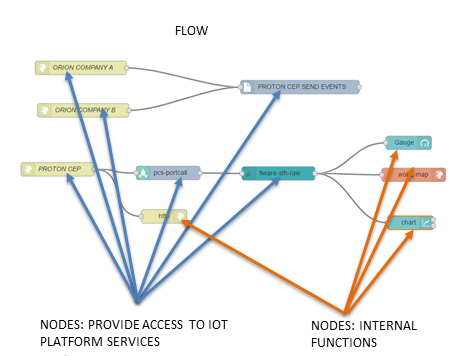
The recipe3 explains how to create these flows of interoperability.
The INTER-IoT Github repository provides extra information about nodes developed during the project.